|
Setup Instructions
Last modified: May 23th, 2003
© 2003 Advantys. All rights reserved. |
Overview
The installation of aspSmartUpload can be broken down into four main stages :
- extract the downloaded file
- saving the aspSmartUpload.dll file on the NT server
- add the aspSmartUploadUtil.dll fils in the NT server Path
- install the samples
These four stages are fully described below.
Configuration required
Server :
- 300Ko of free disk space
- Windows NT 4 Service pack 6a, Microsoft IIS 4
or Windows 95+, Personal Web Server, ASP
or Windows 2000 or Windows 2003
For Microsoft IIS 3 users :
+ VB6 Runtime
+ asp.dll (version 1.0b+) : http://www.microsoft.com/office/intranet/modules/asp411s3.asp
For Microsoft IIS 6 users (Windows 2003) :
+ IIS6.0 prevent the upload of files more than +200Kb.
Open your metaname.XML which is located in c:\Windows\System32\Inetsrv find the line "AspMaxRequestEntityAllowed" and change it to "1073741824". You might need to start windows in Safe-mode to be able to change that file, otherwise it's being used by IIS.
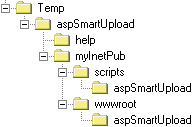
Stage 1 : Extract the downloaded file
All the aspSmartUpload files are supplied in the zipped
file, aspSmartUpload.zip.
Extract aspSmartUpload.zip to a temporary directory, making sure the directory
structure remains intact. If, for example, you extract the file to \temp, you
should see the following :
Stage 2 : Install aspSmartUpload.dll
You have to register aspSmartUpload.dll on your server. The
dll can be registered by using either Regsvr32.exe OR Microsoft
Transaction Server (MTS).
1st Solution: Using RegSVR32
Copy aspSmartUpload.dll into a directory on the NT server (e.g.
c:\mydir).
Save the component using the commands :
REGSVR32.EXE c:\mydir\aspSmartUpload.dll (From DOS or the Start/Run
prompt)
2nd Solution: Using Transaction Server
Select the NT server on which you wish to install aspSmartUpload.
Create a new batch.
In the component folder, create a new component called aspSmartUpload.
Paste aspSmartUpload.dll to the Transaction Server to save it.
Stage 3 : Install aspSmartUploadUtil.dll
The objective is to enable the Operating System to access
the aspSmartUploadUtil.dll file.
There is two ways to archieve this :
- Copy aspSmartUploadUtil.dll in the c:\winnt\system32 directory. That way you
don't have to update the PATH propertie.
- Copy aspSmartUploadUtil.dll into a directory on the NT server (e.g. c:\mydir).
Add the component directory in the PATH using the commands :
PATH=%PATH%;c:\mydir (From DOS)
Stage 4 : Install samples
Installation
The ASP application must be installed in an ASP-script-enabled web directory.
If your site has the following structure :
\inetpub
\inetpub\scripts
\inetpub\wwwroot
Copy the
\temp\aspSmartUpload\MyInetpub\scripts\aspSmartUpload directory
to the
\inetpub\scripts directory on your server.
Copy the
\temp\aspSmartUpload\MyInetpub\wwwroot\aspSmartUpload directory
to the
\inetpub\wwwroot directory on your server.
Test
Using your browser, enter the following addresses :
http://your_web_server/aspSmartUpload/default.htm
| © 2003 Advantys. All rights reserved. |